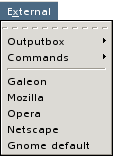
The menu provides a quick access to external default or user-added programs and text filters. It is divided into three parts by default (see Chapter VIII, Customising Bluefish for layout change):
The submenu for text filters. Its name is derived from the output box shown at the bottom of the document window, where you can see the output of the process, when activating it.
The submenu for external programs.
All other items are browsers. They are launched as subprocesses, hence you need to detach them to avoid freezing bluefish until the external program quits.
![[Note]](imgs/note.png) | |
Typically all programs and filters apply to the current document. Nevertheless it is possible to invoke a program without applying it to the current document. On the contrary, it is not possible to apply text filters to anything but the current document. |
Customization of the menu is performed in different parts of the Edit Preferences dialog:
Items in the submenu in the Output parsers tab.
Items in the submenu in the Utilities and filters part at the bottom of the External programs tab.
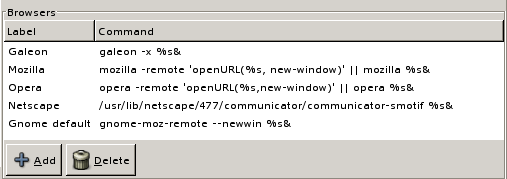
Top level items in the Browsers part at the top of the External programs tab.
The Browsers panel in Preferences shows the items in the same order as in the menu:
![[Note]](imgs/note.png) | |
The first line in the panel will be the browser selected when clicking on the View in browser button in the main tool bar. |
If you want to change the order of the browsers, apply the following steps:
Procedure VII.4. Changing the order of browsers items
Click on the Preferences... icon in the main tool bar to access the Edit preferences panel.
Click on the External programs tab to display the Browsers panel.
Click near the left border of the browser's line you want to move. The whole browser's line will be highlighted:
While maintaining the click, drag the selected line over another line, until you reach the place you want, so that the selected line covers entirely the latter one. The cursor will change its appearance and the dragged line will be shown as a framed line:
![[Note]](imgs/note.png)
To drag a line to the end of the list, drag it until a thin line appears below the last item:
![[Tip]](imgs/tip.png)
If you change your mind, drag the line over its original place and release the mouse button. There will be no change.
Release the mouse button to drop the line at the desired place.
Click on the button to save the change if you plan to make further changes in the panel, otherwise click on the button to save the change and close the Edit preferences panel.
If you want to customize one of the browsers supplied by default, use the following procedure:
Procedure VII.5. Customizing an existent browser
Click on the Preferences... icon in the main tool bar to access the Edit preferences panel.
Click on the External programs tab to display the Browsers panel.
Click on the Command region of the browser's line you want to change. The line will be hightlighted.
Double-click on the same location to allow editing. The line will be framed.
Make the desired change
Click on the button to save and close the panel.
To add a new browser, proceed as follows:
Procedure VII.6. Adding a new browser
Click on the Preferences... icon in the main tool bar to access the Edit preferences panel.
Click on the External programs tab to display the Browsers panel.
Click on the button. A new line will be shown, with an Untitled label.
Double-click on the label to allow editing, and enter the string you want to appear in the menu.
Double-click in the Command zone and enter the command followed by the & sign to detach it from the main bluefish process, for example:
amaya %s &Click on the button to save and close the panel.
To delete a browser, just click on the button.
Though nothing impedes you to put any command (not necessary a browser) in the panel for quick access, you may want to avoid to put it at the top range, since it will be somewhat strange to click on View in browser to launch abs for example.
To add items to the → submenu, you use the External programs tab of the Edit Preferences panel:
You add, modify, delete, move commands or text filters the same way as described in Section 8.1, “Customizing browsers”.
Bluefish will apply the supplied command on the current document, while representing the document as it is before the command is applied by %s and the document after the command has been applied by %f. Usage of the %i parameter is not implemented yet. You should embed those parameters into simple quotes to prevent special characters to be interpreted by the shell.
Usage of the parameters depends on the command:
If the command does not operate on the file, as xterm, you just supply it as you would in an xterm, detaching it to avoid bluefish freezing with:
xterm &If the command does operate on the file, but not on the file's contents, as chmod, you supply it as you would in an xterm, using
%sas a reference to the current document:chmod +x '%s'If the command operates on the standard input device by default, as tidy, you will have to redirect the document's contents, i.e.
%s, with cat for example, to the standard output device, pipe the result so that it will be used as standard input device for the command, then redirect the result of the command to the document, i.e.%f, as in:cat '%s' | tidy 'someoptions' > '%f'If the command operates on file's contents, as sed, you should use input, i.e.
%sand output, i.e.%fredirection to feed the command with the right parameters, as in:sed -e 'somesedcommand' < '%s' > '%f'
As those parameters are used internally to create temporary files, you cannot use them to modify the name of the final document for example. But you can redirect the standard output to a named file, if you do not want to override the current document, as in:
sed -e 'somesedcommand' < '%s' 1 > 'namedfile'
Here is an example to get rid of hard-coded /usr in a source file:
Procedure VII.7. Adding a Commands menu item
Click on the Preferences... icon in the main tool bar to access the Edit preferences panel.
Click on the External programs tab to display the Utilities and filters panel.
Click on the button. A new line will be shown, with an Untitled label.
Double-click on the label to allow editing, and enter the string you want to appear in the menu.
Double-click in the Command zone and enter:
sed -e 's|\/usr|${PREFIX}|g' < '%s' > '%f'.![[Note]](imgs/note.png)
We need to escape the slash in
/usrwith a backslash to avoid interpretation by the shell.Click on the button to save and close the panel.
Items within the → submenu allow for programs to give feedback by opening an output box at the bottom of Bluefish's main window.
Here is an example showing the output box after using the → → item on an html file with an on purpose error:
The contents of the resulting output box are based upon scanning the output of the supplied command, as it appears in an xterm, with a given regular expression and filling in the various fields of the output box with the desired parts of that regular expression. The Output parsers tab of the Edit preferences panel provides you with a model to do that:
The Outputbox panel comprises 7 fields:
The Name field, a character string which will appear as the item in the menu.
The Pattern field, a Perl regular expression which describes the command output, so that some of its parts could be used in the following fields.
Let's use an example: say you have a ruby script named foo.rb with the following line in it:
put Hello Word
When executing ruby -d foo.rb in an xterm, the output is:
Exception `NoMethodError' at foo.rb:1 - undefined method `put' for main:Object
foo.rb:1: undefined method `put' for main:Object (NoMethodError)
The second line can be parsed with the following Perl regular expression:
([a-zA-Z0-9/_.-]+):([0-9]+):(.*)
The first part embedded into parentheses will match the script name, i.e. foo.rb; the second part will match the line, i.e. 1: the third part will match the remaining. See Section 5.3, “Find and Replace Using Regular Expressions” for some explanation on using regular expressions within bluefish.
The File # field, a part number matching the filename in the Perl regular expression given in the Pattern field. Note that the first part is numbered 1, the second 2, etc. If you do not want that the part be shown, put -1 in it.
The Line #, a part number matching the line number in the regular expression, here it will be 2, as same rules apply as in the Filename # field.
The Output # field, a part number matching the desired part in the regular expression, typically the remaining of the line, here it will be the third and last part. Again, same rules apply as in the Filename # field.
The Command field, the command to execute on the current document, internally named %s. Here it will be:
ruby -d '%s'. Notice that you should embed the reference to the current document, if any, within parentheses to avoid interpretation at run time.The Show all output check box, which can be checked to show all output not matching the Perl regular expression. Here it is not needed, since the regular expression matches all output.
You add, modify, delete, move output boxes the same way as described in Section 8.1, “Customizing browsers”.
Procedure VII.8. Adding an Outputbox menu item
Execute the desired command in an xterm with some error either in the command or in the file which it is applied on, in order to know how the errors are outputting.
Build a Perl regular expression based on the output, so that the filename, the line number and the error message be retrieved.
Click on the Preferences... icon in the main tool bar to access the Edit preferences panel.
Click on the Output parsers tab to display the Outputbox panel.
Click on the button. A new line will be shown, with an Untitled label.
Click "Add" to add a new item.
Double-click on the Name field to give the command a name.
Double-click on the Pattern field and fill it in with the Perl regular expression you have built previously.
Double-click on the File # field and give the number for the subpattern matching the filename (-1 for none).
Double-click on the Line # field and give the number for the subpattern matching the line number (-1 for none).
Double-click on the Output # field and give the number for the subpattern matching the actual error message (-1 for none).
Double-click on the Command field and enter the command to execute in the form command options '%s', %s being the current filename.
Toggle the "Show all output" check box to show output NOT matching the regular expression, if needed.
![[Note]](imgs/note.png) | |
Of course, it is also possible to add these items by editing the file named |


